Introduction
Sidechain compression is one of the most important things I ever learned as a music producer. It is a powerful tool that brings depth, clarity, and rhythm to your beats. Ableton Live provides a user-friendly interface for using sidechain compression. In this guide, we'll walk through a step-by-step process to help you effectively use sidechain compression in Ableton Live, instantly enhancing your music production.
DOWNLOAD 30+ FREE SAMPLE PACKS - CLICK HERE

1. Understanding Sidechain Compression:
Dynamic Control:
- Compressor Functionality: A compressor reduces the dynamic range of a signal, and sidechain compression involves using one signal to trigger the compression on another.
- Rhythmic Effects: Sidechain compression is commonly used to create rhythmic effects, such as the classic "pumping" effect in dance music.
2. Choosing Your Source and Destination:
Identify Key Elements:
- Source Track: Select the track that will act as the trigger for the compression (usually a kick drum or another rhythmic element).
- Destination Track: Choose the track that will be affected by the sidechain compression (e.g., bass, pad, or vocals).
3. Routing the Sidechain Signal:
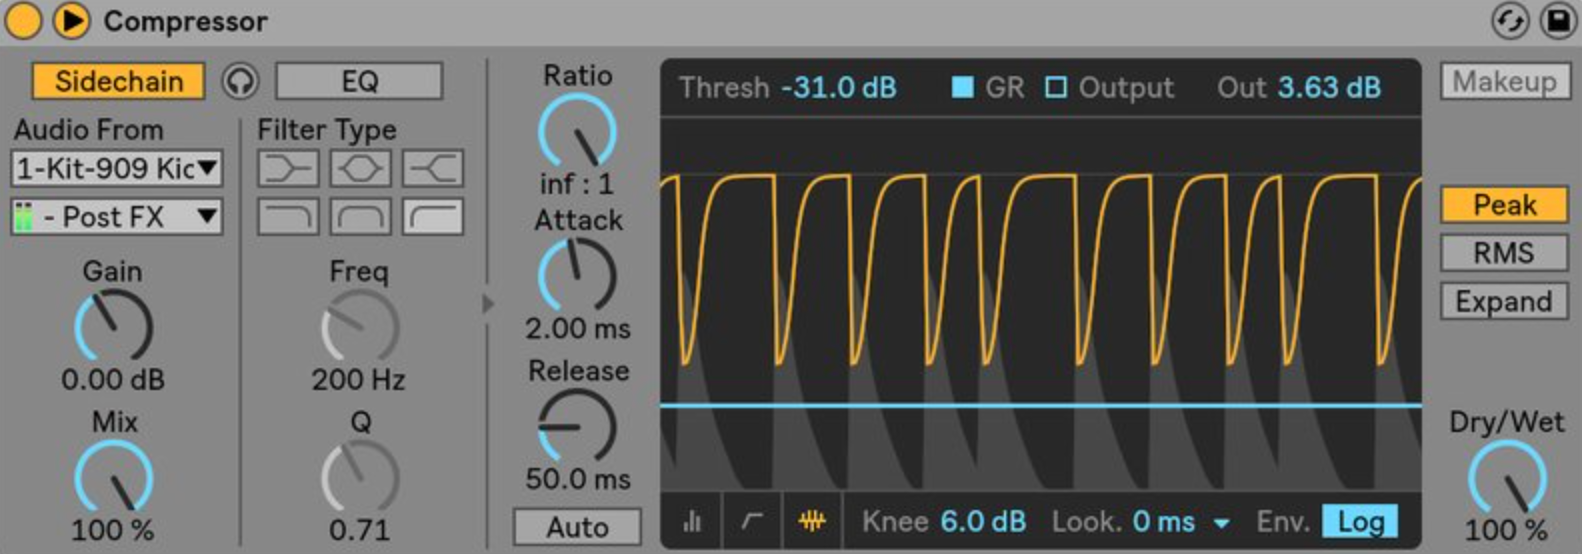
Add the Ableton compressor to the track you want to sidechain. Click the arrow in the top left corner of the plugin.
Press the "sidechain" button and select the source track (usually will be your kick drum)

4. Setting Threshold and Ratio:
Adjust Compression Parameters:
- Threshold: Set the threshold to determine when the compression will start. Lower values trigger compression more often.
- Ratio: Adjust the ratio to control the degree of compression applied when the threshold is crossed.

5. Fine-Tuning Attack and Release:
Attack Time:
- Preserving Transients: Adjust the attack time to control how quickly the compression responds. A faster attack preserves transients for a punchier effect.
- Softening Transients: A slower attack time can soften transients for a more gradual effect.
Release Time:
- Natural Decay: Set the release time to allow the compression to smoothly follow the natural decay of the source signal.
- Avoid Pumping Artifacts: Be mindful of release times to prevent unnatural pumping artifacts.

6. Visualizing Compression in Ableton Live:
Use the Compressor Visualization:
- Visual Feedback: The Compressor device in Ableton Live provides a graphical representation of the compression process.
- Adjust Parameters: Fine-tune your compression settings while observing the visual feedback for a clear understanding.
7. Experimenting with Additional Effects:
Create Pumping Effects:
- Volume Automation: Create volume automation for the destination track to shape the dynamic response further.
- Automation Curves: Utilize automation curves to craft precise sidechain effects at different sections of your arrangement.
8. Saving and Managing Sidechain Presets:
Save Settings for Future Use:
- Ableton Live Device Presets: Save your sidechain compression settings as a preset within the Compressor device for easy recall.
- Copy and Paste Settings: Copy and paste the compressor settings between tracks for consistent sidechain compression across elements.
Conclusion
Sidechain compression in Ableton Live is a dynamic and creative tool that can elevate your mixes and bring a rhythmic pulse to your productions. By understanding the routing, adjusting parameters, and experimenting with visual feedback, you can confidently integrate sidechain compression into your music-making process. Whether you're aiming for subtle dynamic control or bold pulsating effects, let Ableton Live be your canvas for dynamic expression. Dive in, experiment, and unlock the full potential of sidechain compression in your music production journey. Happy producing!


